Streamlabs Transition Integration: Common Issues Solved

Struggling with Streamlabs transitions? You're not alone. Many streamers face crashes, black screens, lag, or audio glitches when setting up transitions. These issues can disrupt your stream and frustrate viewers. Here's how to fix them:
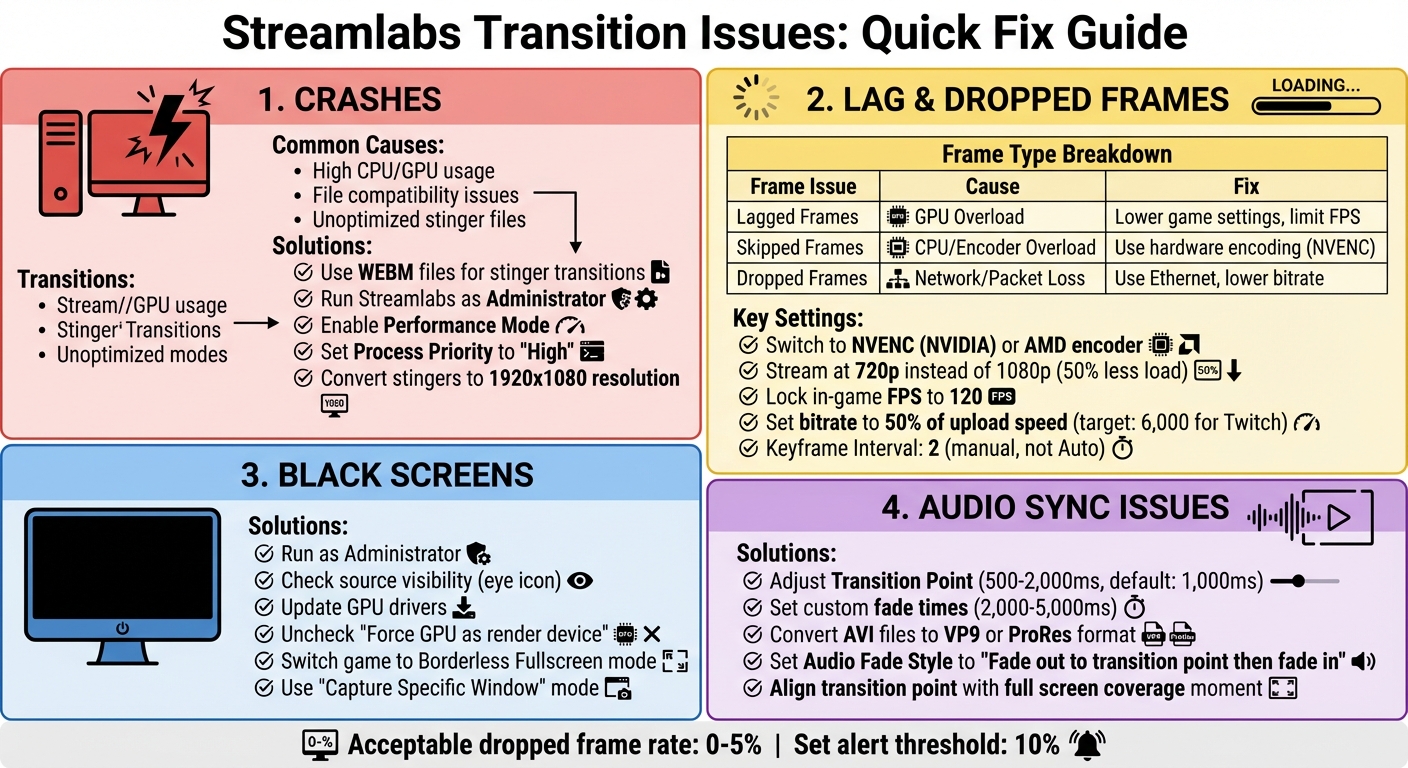
- Crashes? Use WEBM files for stinger transitions, run Streamlabs as Administrator, and enable Performance Mode to reduce system strain.
- Lag or dropped frames? Switch to hardware encoding (e.g., NVENC for NVIDIA GPUs), lower transition file resolution, and limit FPS.
- Black screens? Check source visibility, run as Administrator, and update GPU drivers.
- Audio sync issues? Adjust transition points and fade settings, and convert files to compatible formats like VP9.
Streamlabs Transition Issues: Troubleshooting Guide for Crashes, Lag, and Audio Problems
How To Add Transitions in Streamlabs - Quick Fix
sbb-itb-94859ad
How to Fix Transition Crashes
Transition crashes in Streamlabs Desktop typically happen when the software pushes your system resources to their limits or encounters file compatibility problems during transition animations and live encoding.
Stinger Transition Crashes
Stinger transitions are especially prone to causing crashes because they involve rendering an alpha (transparency) layer during scene switches. Unoptimized files can overwhelm your system. To avoid this, use WEBM files, as they handle transparency effectively and are less resource-intensive.
Here are a few steps to reduce the strain on your system:
- Run Streamlabs Desktop as an administrator.
- Set the Process Priority to "High" in Advanced Settings.
- Enable Performance Mode in the preview window to lower GPU usage.
"Generally, this is caused by high CPU or GPU usage, but can also be the encoding process bottle-necking your system." - Nerd or Die Support
If the issue persists, convert your stinger transition to a WEBM file with a resolution of 1920x1080. Also, close unnecessary background applications to free up CPU resources. These adjustments not only prevent crashes but also ensure your stream maintains a polished and uninterrupted look.
Now, let’s tackle another common problem: encoder failures that cause the stream to drop to 0kbps during transitions.
Stream Drops to 0kbps During Transitions
A sudden drop to 0kbps during transitions is a sign of encoder failure, often triggered by data spikes from simultaneous rendering and encoding.
To resolve this:
- Reset your transition setup by removing and re-adding it through the Scenes gear icon.
- Switch to hardware encoding in the Output settings. If you have an NVIDIA GPU, select NVENC (H.264) to shift the processing load from your CPU to the GPU.
For further stability, configure the Advanced Output Mode settings:
- Set the Output Mode to "Advanced."
- Change Bitrate Control to CBR (Constant Bitrate).
- Manually set the Keyframe Interval to 2.
Avoid using "Auto" for keyframe intervals, as it can lead to stream instability. These manual settings help provide a more consistent and reliable streaming experience.
How to Fix Performance Problems During Transitions
Performance issues during transitions - like lag, stuttering, or dropped frames - can be frustrating and often boil down to GPU, CPU/encoder, or network bottlenecks. Transitions, especially those with animated stingers or multiple browser sources, can temporarily spike resource usage, potentially overwhelming your system.
To stay on top of these issues, enable alerts for skipped, delayed, and dropped frames in your settings. Set the notification threshold to 10% so you can quickly catch any performance dips. Generally, a dropped frame rate of 0–5% is considered acceptable before viewers notice any quality issues.
Reduce CPU and GPU Load
One way to ease CPU strain is by switching to hardware encoding. If you have an NVIDIA GPU, select NVENC in your Output settings. AMD users should opt for the AMD encoder.
If you're already using hardware encoding, tweak your encoder preset. For NVIDIA GPUs, change the preset from "Quality" to "Performance" or "Max Performance" to lighten the load on your GPU. For those using x264 encoding, consider moving to faster presets like "superfast" or "ultrafast." These use less CPU power, though they might slightly reduce image quality.
Here’s a quick breakdown of common issues and their fixes:
| Issue Type | Primary Cause | Primary Fix |
|---|---|---|
| Lagged Frames | GPU/Compositor Overload | Lower game settings; limit FPS; simplify scenes. |
| Skipped Frames | CPU/Encoder Overload | Use hardware encoding; switch to "superfast" CPU preset. |
| Dropped Frames | Network/Packet Loss | Use Ethernet; lower bitrate; manually select server. |
Another tip: lower your output resolution. Streaming at 720p instead of 1080p reduces the workload on your system by half. Locking your in-game frame rate to 120 FPS can also help - it divides evenly into 60 FPS or 30 FPS streams, reducing compositor overload. If you’re using animated overlays or browser sources, try temporarily disabling them by clicking the eye icon in your source list to see if performance improves.
While optimizing your CPU and GPU can help with many problems, network stability plays an equally important role.
Prevent Network Overload
Network issues are often the root cause of dropped frames, not hardware limitations.
"Dropped frames are almost always a network issue. Sometimes the issue cannot be resolved without contacting your ISP." - Kevin from Streamlabs
Switching from Wi-Fi to a wired Ethernet connection is a game-changer. Wi-Fi tends to introduce jitter and packet loss, which can destabilize your stream. To account for network fluctuations, limit your streaming bitrate to 50% of your measured upload speed. For Twitch, a bitrate of 6,000 is a good target for stability.
Manually selecting your ingest server instead of relying on the "Auto" setting can also improve performance. Automatic routing might send your data through congested or distant nodes, while manual selection ensures a shorter, more reliable path to the streaming platform. Additionally, make sure your router's outbound port 1935 (TCP) is open to avoid any throttling of streaming traffic.
If network issues persist, try restarting your modem and router. Also, update your network drivers directly from your motherboard or laptop manufacturer's website for the best compatibility.
How to Fix Rendering and Display Problems
Rendering issues during transitions - like black screens or failed animations - can often be traced back to mismatched sources, permission errors, or GPU-related conflicts. These glitches can interrupt your stream, leaving viewers staring at a blank screen instead of enjoying seamless scene transitions.
Black screens typically happen when a source isn't set up correctly, the visibility "eye" icon is turned off, or the wrong window is selected in your capture settings. Running Streamlabs without administrative privileges can also block it from capturing high-privilege games or windows. Additionally, installing Streamlabs outside the default "Program Files" directory may interfere with permissions needed for certain Windows Store games, such as Sea of Thieves.
Black Screen Problems
To address black screen issues, start by running Streamlabs as Administrator. Right-click the shortcut and select "Run as Administrator" to grant the necessary permissions. If the problem persists, go to Settings > Advanced and uncheck "Force GPU as render device" to avoid hardware-level conflicts.
You can also try disabling hardware acceleration in your browser and toggling the "Anti-cheat Hook" option in Game Capture settings. Switching your game's display mode from "Exclusive Fullscreen" to "Borderless Fullscreen" can help improve compatibility during transitions.
If none of these work, delete the problematic capture source, restart Streamlabs as Administrator, and re-add the source using "Capture Specific Window" mode. Make sure the visibility icon for the source is turned on - if it's off, the source won't render even if everything else is set up correctly. Lastly, update your graphics drivers directly from the official websites for NVIDIA, AMD, or Intel to fix any compatibility issues.
If these steps don't resolve the issue, take a closer look at your transition animation settings.
Failed Transition Rendering
Once display issues are addressed, you might still encounter problems with stinger transitions. These transitions can sometimes fail to render the alpha (transparency) layer properly, which can block the screen at the start or end of the animation. To troubleshoot, upload a Diagnostic Report through Settings > Get Support to help identify the issue.
Make sure Streamlabs is running as Administrator. Clear the cache by deleting the contents of the %appdata%\slobs-client folder on Windows or the ~/Library/Application Support/slobs-client folder on macOS. Verify that the Microsoft Visual C++ Redistributable 2022 is installed on your system. Also, avoid mixing "Display Capture" and "Game Capture" sources within the same scene, as this can cause conflicts.
If you're using third-party overlays like Discord or Steam in your games, disable them temporarily. These overlays can interfere with Streamlabs' ability to render transitions smoothly.
How to Fix Audio Problems in Transitions
Audio glitches during transitions can be just as jarring as visual issues. Two common challenges include abrupt audio cuts and audio–video sync problems. These often stem from a limitation in Streamlabs OBS - it supports single-source fade-outs but lacks true crossfading capabilities.
Audio Cuts Instead of Fading
Streamlabs OBS doesn’t allow for simultaneous fade-outs across all audio sources. As Elliot Kim of SoundCy explains:
"Streamlabs OBS does not natively support applying fade-out effects to all audio sources simultaneously. You'll need to adjust each source individually".
To smooth out audio transitions, you can tweak several settings:
- Go to Advanced Audio Properties and set custom fade times, typically between 2,000 and 5,000 milliseconds.
- Use the Show Volume Automation feature to add keyframes for a more natural fade effect.
- Enable Preload Video to RAM for stinger transitions to reduce decoding delays.
File format compatibility can also be a culprit. For instance, AVI files used in stinger transitions may cause abrupt cuts. Converting them to VP9 or ProRes formats often resolves this. As OBS Project member PatTheMav notes:
"Does the same issue occur when the AVI is converted to VP9 or ProRes? If it doesn't, that might suggest that either the timecodes in the AVI are broken or our handling of the timecodes is".
Lastly, check the "Transition Point" setting in your stinger settings. If the transition point is triggered before the audio finishes, it will cut off the sound prematurely. Align the transition point with your audio cue for a seamless effect.
Once you’ve tackled the fading issues, the next challenge is ensuring audio stays in sync with your visuals.
Audio and Video Sync Issues
Audio–video sync problems during transitions often happen when the "Transition Point" doesn’t align with the moment your animation fully covers the screen. Streamer Magazine explains:
"Transition point means the timing when the screen changes during video playback. If you want a smooth scene switch, set it when the video covers the entire screen".
By default, the transition point is set to 1,000 milliseconds. Experiment with values between 500 and 2,000 milliseconds to find the sweet spot for your animation. Additionally:
- In the stinger settings, set the Audio Fade Style to "Fade out to the transition point then fade in."
- Configure Transition Audio Monitoring to "Monitor Only (mute output)" to avoid overlapping sounds.
If sync issues persist, your CPU or GPU might be struggling with complex stinger transitions. Switching to simpler options like "Fade" or "Swipe" can help lighten the load and improve performance.
Wrapping It Up
Getting your transitions set up correctly can completely transform your broadcast. It helps you avoid crashes, performance hiccups, rendering glitches, and audio sync problems. Each of these issues has a straightforward fix, as we've covered.
- Crashes? Try running Streamlabs as an administrator, keep your GPU drivers updated, and remove any plugins that might be causing conflicts.
- Performance lags? Lower the resolution of your transition files and make sure your settings are optimized. Running Streamlabs as an administrator and using the right transition files can make all the difference.
- Rendering or audio sync problems? Stick to the right file formats and ensure your transition points are precise.
As Dexpixel wisely notes:
"Smooth transitions create an immersive and enjoyable flow... making your stream feel polished and professional".
The key to keeping your stream professional and seamless is staying on top of these optimizations. It’s not a one-and-done deal - keep tweaking your timing settings and managing your system resources until everything feels just right.
FAQs
What’s the best stinger file format for Streamlabs?
The best stinger file format for Streamlabs is WebM. This format provides excellent visual quality while keeping file sizes smaller, which helps ensure smooth transitions without affecting performance. It's a popular choice due to its compatibility and efficiency.
How can I tell if transitions are overloading my CPU, GPU, or network?
When streaming, it's a good idea to monitor your system's resource usage to avoid overloading it. If your CPU or GPU usage is hitting close to 100%, it can lead to performance hiccups, especially during transitions. Tools like your system's task manager or a system monitoring app can help you keep track of these metrics in real time.
Don't forget about your network usage, too. Heavy network demands can cause problems, particularly if your transitions rely on remote resources. For example, if stinger transitions aren't rendering correctly, it could be a sign that your system is running low on available resources.
What transition point should I use to avoid audio sync issues?
To keep audio and video in sync in Streamlabs, make sure the transition point matches the precise moment the scene change happens in your transition video. This alignment helps maintain synchronization between the transition and audio during scene switches. Tweaking this setting is key to achieving a seamless experience without any desynchronization.
Related posts
LongStories is constantly evolving as it finds its product-market fit. Features, pricing, and offerings are continuously being refined and updated. The information in this blog post reflects our understanding at the time of writing. Please always check LongStories.ai for the latest information about our products, features, and pricing, or contact us directly for the most current details.