YouTube Upload Settings: File Formats and Codecs
YouTube re-encodes every video you upload, so starting with the right settings ensures faster processing, better visuals, and smooth playback. Here's what you need to know:
- File Format: Use MP4 for the best compatibility.
- Video Codec: H.264 (High Profile) with CABAC and closed GOP.
- Audio Codec: AAC-LC at 48kHz, 384 kbps for stereo.
- Resolution: Stick to the native aspect ratio and frame rate (e.g., 1080p30, 4K60).
- Bitrate: Match your resolution and frame rate (e.g., 1080p at 8 Mbps for 30 fps, 12 Mbps for 60 fps).
- Other Tips: Convert interlaced footage to progressive, use BT.709 color space for SDR, and avoid padding like black bars.
YouTube Recommended File Formats
Supported Video Container Formats
YouTube supports a wide range of video formats, but MP4 is the go-to choice for the best compatibility and processing efficiency. While other formats like .MOV, .AVI, .WMV, .FLV, .WebM, .MPEGPS, 3GPP, and .MPG are also accepted, MP4 tends to deliver the smoothest results.
For broadcast-quality content, YouTube can handle MPEG-2 program streams (.MPG) or original 1080p HD files. However, sticking with MP4 is a safer bet to avoid potential processing hiccups.
When exporting MP4 files, ensure the moov atom is positioned at the front (commonly referred to as Fast Start) and that there are no Edit Lists. Most modern video editing tools take care of this automatically, but it's worth double-checking your export settings to be sure.
Keep in mind that YouTube does not accept audio-only formats like MP3, WAV, or PCM. If your content is audio-based, you'll need to pair it with at least a static image using video editing software before uploading.
Once your format is sorted, make sure your file size and duration meet YouTube's requirements.
File Size and Duration Limits
YouTube allows uploads up to 128 GB in file size or 12 hours in duration. For those using tools like YouTube's Content Manager or professional systems such as the DDEX feed, videos must meet a minimum audio-visual duration of 33 seconds. This rule excludes videos that consist only of silence, background noise, or static visuals. So, ensure your content meets this minimum threshold to avoid any upload issues.
I use these settings to get the best and fastest YouTube upload settings
YouTube Recommended Video and Audio Codecs
Getting the right video and audio codecs is key to ensuring smooth playback on YouTube.
Recommended Video Codecs
For video uploads, H.264 is the go-to codec. It offers excellent quality while keeping file sizes reasonable. When exporting, use H.264 with High Profile, enable CABAC, set 2 consecutive B-frames, and configure a closed GOP to half your frame rate.
When it comes to 4K playback, YouTube re-encodes your uploads into VP9, which is optimized for high-resolution streaming. Even though you upload in H.264, YouTube handles the conversion for the best viewing experience.
If your footage is interlaced (like 1080i60), convert it to progressive (e.g., 1080p30) before uploading. Also, set the chroma subsampling to 4:2:0 to avoid visual glitches.
Supported Audio Codecs
For audio, AAC-LC at 48kHz is recommended. Use a bitrate of 384 kbps for stereo and 512 kbps for 5.1 surround sound. YouTube also supports Opus and Eclipsa Audio at 128 kbps per channel.
If you're working on a high-quality project, upload in lossless formats like FLAC or Linear PCM (24-bit) to maintain the best audio quality after YouTube's re-encoding process.
sbb-itb-94859ad
Resolution, Frame Rate, and Bitrate Settings
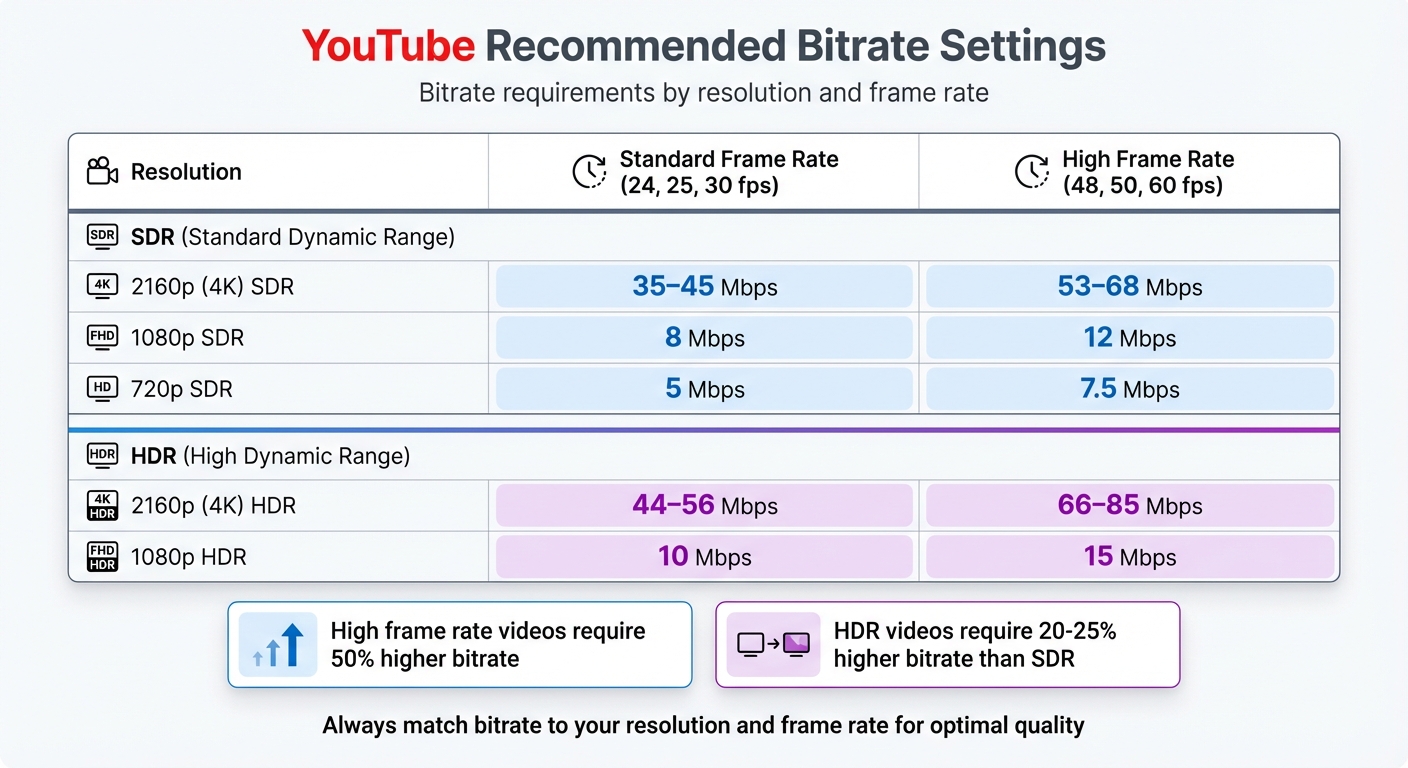
YouTube Recommended Bitrate Settings by Resolution and Frame Rate
Resolution and Aspect Ratio Recommendations
When preparing your videos, it's crucial to align resolution and bitrate settings with the intended platform and content type. For YouTube, the 16:9 aspect ratio is the go-to standard for desktop viewing, covering resolutions from 720p up to 8K. On the other hand, YouTube Shorts demand a 9:16 vertical aspect ratio, typically set at 1080x1920 resolution.
Keep in mind that 4K files are significantly larger - around four times the size of 1080p files - which can lead to longer processing times. If you're producing videos in bulk, such as with tools like LongStories.ai, starting with 1080p resolution can save time while still maintaining excellent quality — a practical choice for long-form video creators uploading at scale.
"For best results, avoid adding padding or black bars directly to your video. Padding interferes with YouTube's ability to change the player dynamically." - YouTube Help Center
When uploading, stick to the video's native recorded frame rate, such as 24, 25, 30, 48, 50, or 60 fps. Also, make sure to convert any interlaced footage into progressive formats (e.g., 1080p30) to prevent playback issues.
Finally, ensure your bitrate settings align with your resolution and frame rate to achieve the best visual quality.
Bitrate and Frame Rate Checklist
Bitrate requirements vary significantly depending on the frame rate. High frame rate videos (48, 50, 60 fps) demand a much higher bitrate than standard frame rate content (24, 25, 30 fps). If you've used AI frame interpolation to boost footage to 60fps, make sure to use the high frame rate bitrate tier in the table below. For instance, a 1080p SDR video at 30 fps requires 8 Mbps, but at 60 fps, the bitrate jumps to 12 Mbps - a 50% increase.
| Resolution | Standard Frame Rate (24, 25, 30 fps) | High Frame Rate (48, 50, 60 fps) |
|---|---|---|
| 2160p (4K) SDR | 35–45 Mbps | 53–68 Mbps |
| 1080p SDR | 8 Mbps | 12 Mbps |
| 720p SDR | 5 Mbps | 7.5 Mbps |
| 2160p (4K) HDR | 44–56 Mbps | 66–85 Mbps |
| 1080p HDR | 10 Mbps | 15 Mbps |
HDR videos require 20–25% higher bitrates than SDR. For example, a 1080p HDR video at a standard frame rate needs 10 Mbps, compared to 8 Mbps for SDR. Always test your videos on mobile devices to confirm they look great across different screen sizes.
Pre-Upload File Preparation Checklist
File Verification Steps
Before uploading your video, make sure it meets all technical specifications. The file should be in a supported format like .MP4, .MOV, or .AVI and use the H.264 video codec with AAC-LC audio codec for smooth processing.
Ensure your video uses progressive scan instead of interlaced footage. If necessary, convert formats like 1080i60 to 1080p30 before uploading. Content coming from a 2D animation workflow is typically already progressive, so no conversion is needed. Audio must be recorded at a 48kHz sample rate, and the video should have a minimum runtime of 33 seconds, excluding silence or black frames.
"YouTube encourages partners to upload videos that are as close to the original, high quality source format as possible to increase the likelihood that your videos will play in higher quality (HQ)." - YouTube Help
Upload your video in its native aspect ratio without adding letterboxing or pillarboxing bars, as YouTube's player adjusts automatically to fit your video's dimensions. For creators managing large-scale content, such as those using platforms like LongStories.ai, following these steps ensures consistent quality.
Once verified, configure your editing software with the correct export settings to streamline the upload process.
Export Settings for Editing Software
When exporting your video, use the following settings. Choose MP4 as the container format, with H.264 for the video codec and AAC-LC for audio. Enable "Fast Start" or "Web Optimized" to move the moov atom to the beginning of the file, allowing YouTube to start processing while the upload is still in progress.
Here's a quick reference for the recommended export settings:
| Setting | Recommended Value |
|---|---|
| Format/Container | MP4 |
| Video Codec | H.264 (High Profile, 2 consecutive B frames, CABAC, Closed GOP) |
| Audio Codec | AAC-LC (Stereo or 5.1) |
| Sample Rate | 48kHz |
| Chroma Subsampling | 4:2:0 |
| Scan Type | Progressive |
| Color Space | BT.709 |
Set the Group of Pictures (GOP) to "Closed" with a length that's half your frame rate. For stereo audio, use a bitrate of 384 kbps, and for 5.1 surround sound, go with 512 kbps. Also, ensure the file does not include edit lists, as these can interfere with YouTube's processing.
Conclusion
Key Takeaways
Getting your upload settings right is the key to ensuring top-notch video quality and performance. Stick with the MP4 container, pairing it with the H.264 video codec and AAC-LC audio codec for smooth processing and playback on YouTube. Always upload videos at their native frame rate without resampling, and use BT.709 for standard dynamic range (SDR) content.
For bitrates, match them to your video's resolution and frame rate. For example, 1080p and 4K videos benefit from specific bitrate ranges depending on their frame rates. On the audio side, aim for a 48kHz sample rate, with 384 kbps for stereo and 512 kbps for 5.1 surround sound.
And here's a tip: skip manual letterboxing. YouTube's player automatically adjusts to your video's aspect ratio, so always upload in your video's original dimensions.
Next Steps for Creators
Now that you know the ideal settings, it's time to put them into action. Configure your editing software to these specifications and try uploading a private video to verify the quality. This ensures YouTube's re-encoding process works with the best possible source material.
If you're managing a large volume of content, keeping consistent standards can be tricky. Tools like LongStories.ai can help streamline production while maintaining quality across multiple uploads. By building these settings into your workflow, you'll ensure every video you publish meets the highest standards.
FAQs
Why does YouTube recommend using MP4 for uploads?
YouTube suggests uploading videos in the MP4 format because it integrates perfectly with the platform's processing system. When combined with the H.264 codec, MP4 files provide efficient compression, preserving excellent video quality while keeping file sizes smaller. This means your uploads will be faster, and your audience will enjoy smoother playback.
On top of that, MP4 is compatible with most devices and editing programs, making it a dependable option for creators aiming to simplify their production process.
Why should I use the H.264 codec when uploading videos to YouTube?
The H.264 codec is a go-to choice for YouTube uploads because it offers an excellent mix of compression and video quality. It effectively shrinks file sizes, which speeds up uploads, while maintaining clear visuals for your audience. Plus, H.264 is supported by YouTube and works seamlessly across most devices, so your videos can be enjoyed by a wide range of viewers without any compatibility hiccups.
How does the bitrate setting impact video quality on YouTube?
The bitrate setting plays a key role in determining your video's quality on YouTube. A higher bitrate means more data is processed every second, delivering sharper and more detailed visuals - especially important for high-resolution formats like 4K. That said, pushing the bitrate too high might not noticeably improve quality but will likely increase your upload time. To strike the right balance, stick to YouTube's recommended bitrate guidelines based on your video's resolution and frame rate.
Related posts
LongStories is constantly evolving as it finds its product-market fit. Features, pricing, and offerings are continuously being refined and updated. The information in this blog post reflects our understanding at the time of writing. Please always check LongStories.ai for the latest information about our products, features, and pricing, or contact us directly for the most current details.