Common YouTube Live Stream Mistakes to Avoid

YouTube live streaming is a great way to connect with your audience, but it’s easy to make mistakes that cost you viewers. Here are the top five errors to avoid and how to fix them:
- Not Promoting Your Stream: Unannounced streams often lead to low attendance. Schedule your stream 24–48 hours ahead, share the link widely, and build excitement with teaser content.
- Ignoring Your Audience: Live streaming is about interaction. Balance delivering content with engaging your viewers through comments, polls, and Q&A sessions.
- Focusing Too Much on Comments: Overdoing audience interaction disrupts your flow. Set structured times to address comments without derailing your message.
- Poor Technical Setup: Bad audio, buffering, or pixelation can drive viewers away. Use a wired internet connection, optimize OBS settings, and invest in good lighting and an external microphone.
- Streaming Without Preparation: Without a clear plan, streams can feel disorganized. Create an outline, test your setup, and rehearse to avoid technical hiccups or awkward pauses.
Key takeaway: Preparation and interaction are critical. Promote your stream, engage your audience meaningfully, and ensure your technical setup is reliable. With proper planning, you’ll keep viewers engaged and grow your community.
6 Live Streaming Mistakes and How to Avoid Them
Mistake 1: Not Promoting Your Live Stream
Unannounced live streams often lead to an empty audience. While 37% of social media users consider live streams the most engaging type of in-feed content, that engagement won't happen if viewers don't know you're going live.
"If you do not create enough awareness before streaming, you could have fewer than expected views."
Promoting your stream early gives your audience time to prepare questions, suggest topics, and plan to attend. This increases the chances of active participation during your broadcast. Additionally, scheduling your stream ahead of time boosts its visibility in YouTube and Google search results, helping you attract a larger audience.
Schedule and Announce Your Stream
Set up your stream 24–48 hours in advance using YouTube Studio. This generates a shareable URL and sends notifications to your subscribers. Share the link widely - through email lists, your website, and social media platforms like X (formerly Twitter), Facebook, Instagram, and LinkedIn. Don’t forget to update your channel banner with the stream’s title, date, and time. A custom thumbnail can make your event stand out, and specific hashtags will make it easier for people to find.
Build Anticipation Before Going Live
Turn your promotion into a countdown. For major streams, start announcing two weeks ahead, then follow up one week out, three days before, and again on the day of the event. Teaser content works wonders - create 60-second clips for platforms like YouTube Shorts, TikTok, or Instagram Reels to give viewers a preview of what’s coming. Use community posts or polls to let your audience vote on topics or submit questions. This not only helps tailor your content to their interests but also makes them feel involved in the process.
Consistency is key. Streaming at the same time and day each week helps your audience form a habit of tuning in. Once you've built anticipation, you can shift your focus to keeping your audience engaged during the live broadcast.
Mistake 2: Ignoring Your Audience
Live streams thrive on real-time interaction. If you ignore comments, you’re missing the whole point of going live - creating a genuine connection with your viewers. Rebecca Xu, Head of Product Marketing at OpusClip, puts it perfectly:
"Live streams are a two-way dialogue that is intended to create a personal connection between the host and the audience." - Rebecca Xu, OpusClip
Skipping audience interaction doesn’t just hurt engagement; it also impacts how algorithms rank your stream, making it harder for others to discover your content. Without that back-and-forth, your stream risks feeling like a one-sided lecture, which can drive down watch time.
Balance Interaction with Content
Striking the right balance between delivering your content and engaging with viewers is crucial. Instead of interrupting your flow every time a comment pops up, plan natural pauses where you can interact. For example, gaming streamers often use loading screens to check chats. Similarly, hosts like Paul Andre de Vera use creative ways, like triggering a "knowledge bomb" sound effect, to highlight audience contributions.
When responding to comments, make sure to read them aloud. This small step helps viewers who might be multitasking, listening in podcast-style, or watching on platforms without access to the live chat. And don’t forget to look directly into the camera lens when replying - it creates the feeling of direct eye contact. As StreamYard explains:
"Looking into the camera lens is looking into the eyes of your audience." - StreamYard
Use Engagement Tools
Take advantage of tools designed to boost interaction. Features like YouTube’s polls, Live Q&A, and comment overlays can energize your audience. Assign moderators to keep spam in check, and enable Slow Mode during busy moments to control the flow of messages. These tools make it easier to manage your stream and keep the focus on meaningful engagement.
Mistake 3: Focusing Too Much on Comments
Engaging with your audience is important, but overdoing it can derail your live stream. Constantly stopping to address every comment interrupts your flow and weakens your message. Rebecca Xu, Head of Product Marketing at OpusClip, explains it perfectly:
"Effective interaction can be as simple as acknowledging a comment from viewers (although you should not do this in the middle of a conversation you are having, as you will lose your train of thought and disrupt the cadence of the show)."
Pausing mid-sentence or during a detailed explanation to respond to comments can confuse viewers, especially those who can't see the live chat. It’s all about finding the right balance between delivering your content and engaging with your audience.
Keep Your Stream Structured
A clear plan is your best friend when it comes to live streaming. Outline 3–5 key points for your broadcast and stick to them. StreamYard emphasizes this approach:
"It's easy to let the live comments distract you from the content you're delivering. Be sure to welcome your live viewers, and address their comments and questions, but do it between your key points."
A great example of this is Paul Andre de Vera, founder of the "SEO Video Show" on YouTube. In January 2023, he used a semi-transparent countdown overlay to display his agenda and upcoming guest. This clever tool kept his stream organized while allowing him to engage with viewers naturally during transitions. You might consider adding a similar agenda overlay to keep both you and your audience on track.
Set Limits on Interaction
Instead of responding to comments in real-time, carve out specific moments for audience interaction. For instance, you could dedicate a segment at the end of a section or use a brief loading screen to signal a Q&A break. This approach ensures you stay focused on your content while still giving viewers the chance to participate. By setting clear boundaries for interaction, you can maintain a smooth flow without leaving your audience feeling ignored.
sbb-itb-94859ad
Mistake 4: Poor Technical Setup
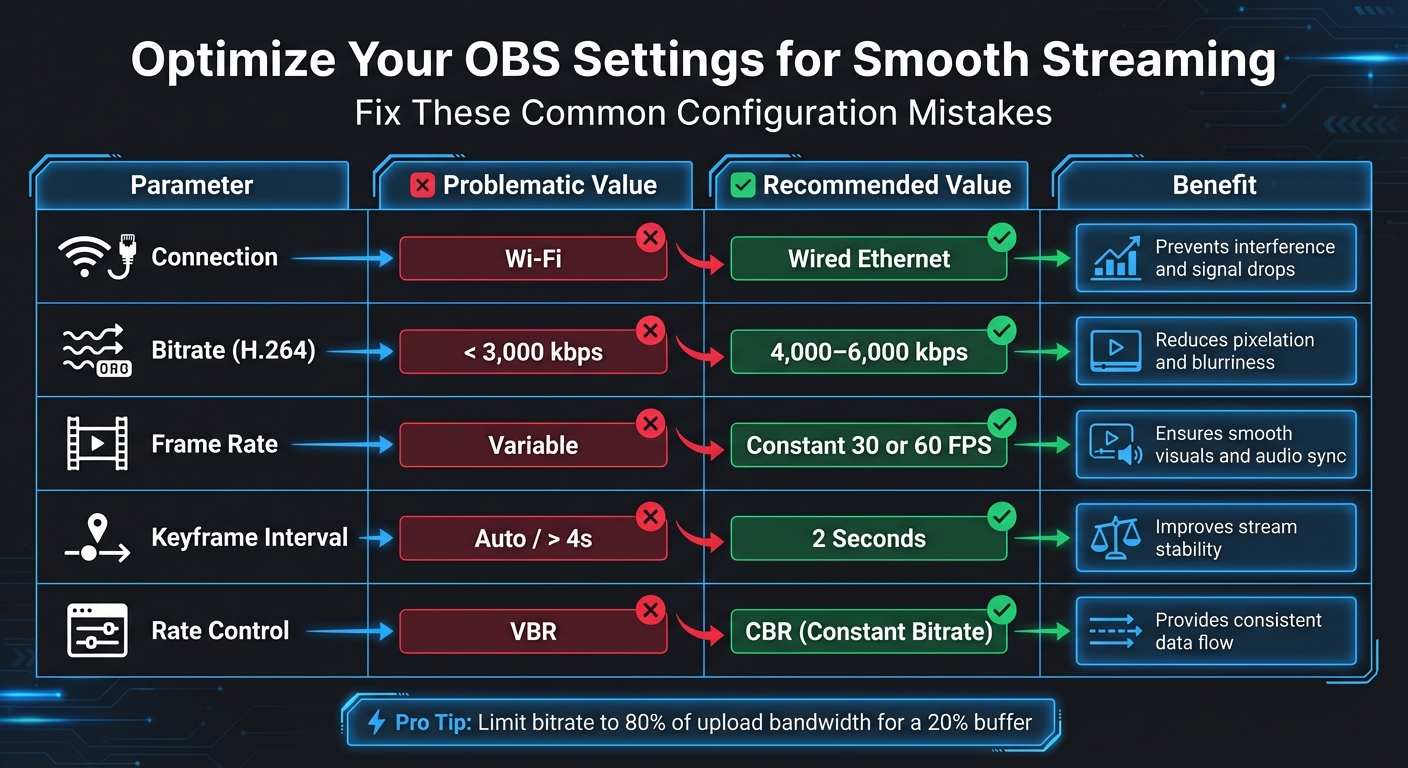
OBS Streaming Settings: Problematic vs Recommended Values
Technical hiccups like buffering, pixelation, or bad audio can quickly turn viewers away. The good news? Most of these issues can be avoided with the right preparation. Let’s dive into how you can fine-tune everything from your internet connection to your audiovisual setup.
Internet Stability Matters
One of the biggest culprits behind streaming failures is unstable internet. While Wi-Fi might feel convenient, it’s prone to interference and signal drops. A wired Ethernet connection is your best bet for a steady and reliable signal. To stream in 1080p, you’ll need at least 5 Mbps upload speed, but it’s safer to aim for double your target bitrate (e.g., 8 Mbps for 4,000 kbps).
To avoid overloading your network, limit your streaming bitrate to 80% of your available upload bandwidth. This leaves a 20% buffer to handle fluctuations and prevents dropped frames. If you’re streaming on a mobile device, keep in mind that you’ll burn through about 10 MB of data per minute. It’s also smart to have a 4G/5G mobile hotspot as a backup. Close unnecessary background apps to free up CPU and GPU resources - high-resolution streaming can be taxing, and maxing out your system could lead to crashes or overheating.
Fine-Tune OBS Settings
Once your internet is stable, optimizing your OBS settings is the next step to ensure smooth streaming. Misconfigured settings can result in dropped frames, lag, or poor video quality. Here’s a quick reference table to help you get it right:
| Parameter | Problematic Value | Recommended Value | Benefit |
|---|---|---|---|
| Connection | Wi-Fi | Wired Ethernet | Prevents interference and signal drops |
| Bitrate (H.264) | < 3,000 kbps | 4,000–6,000 kbps | Reduces pixelation and blurriness |
| Frame Rate | Variable | Constant 30 or 60 FPS | Ensures smooth visuals and audio sync |
| Keyframe Interval | Auto / > 4s | 2 Seconds | Improves stream stability |
| Rate Control | VBR | CBR (Constant Bitrate) | Provides consistent data flow |
Make sure your keyframe interval is set to 2 seconds and doesn’t exceed 4 seconds. In OBS’s Advanced settings, enable "Network Optimizations" and "TCP Pacing." You can also activate dynamic bitrate adjustments, which allow OBS to lower the stream quality temporarily rather than dropping frames when your connection struggles.
Lighting and Audio: Don’t Overlook Them
Even the best camera can’t save you if your lighting is off. Position your primary light source in front of you for balanced illumination. A two-point lighting setup works well to eliminate shadows and create a professional look.
Audio, however, is even more critical. As StreamYard puts it:
"While video is an important part of your live stream, audio is even more important. People accept low-res video quality (for whatever reason), but if the audio is hard to hear, choppy, or you have interference, they might not tune in."
– StreamYard
Ditch your laptop’s built-in mic and opt for an external USB or XLR microphone. Place it close enough to capture your voice clearly, but not so close that it causes popping sounds. Use headphones to avoid audio feedback, and keep an eye on your audio levels in OBS - if they’re hitting the red zone, you’re likely distorting the sound. To improve acoustics, add soft materials like carpets or curtains to reduce echo. And, of course, mute all notifications before you go live to avoid distractions.
Mistake 5: Streaming Without Preparation
Starting a live stream without preparation is like diving into a performance without rehearsing - it’s bound to go off track. Unlike pre-recorded videos, live streams leave no room for edits, meaning every stumble, awkward silence, or technical hiccup is on full display for your audience.
As Jonathan Frazier aptly states:
"One of the biggest live streaming mistakes is failing to plan your stream properly. Not having a clear structure or an idea of what you want to accomplish can leave you fumbling through your broadcast."
The stakes are high. With attention spans averaging just eight seconds, viewers won’t hesitate to click away if your stream feels unorganized. Without preparation, you might scramble for visuals, miss key points, or experience avoidable technical issues. The Spiel Team sums it up perfectly:
"Live streaming success is 90% preparation and 10% delivery."
Create a Stream Outline
A well-thought-out outline acts as your guide for a polished broadcast. Plan out your introduction, main segments, and Q&A breaks to keep your stream focused and flowing smoothly. This approach minimizes the risk of losing track while juggling live content and chat interactions.
In January 2023, Paul Andre de Vera, founder of the SEO Video Show, used a semi-transparent countdown overlay to preview the day’s agenda. This simple addition kept both him and his audience aligned throughout the stream. You can do the same by incorporating a visual agenda overlay that outlines what’s coming next. Instead of relying solely on a static countdown timer - which might bore early viewers - use engaging questions like “Where are you tuning in from?” to keep them involved as the stream begins. Schedule specific moments for giveaways, personal stories, or audience challenges to maintain a dynamic and professional flow.
Test Everything Before You Start
Technical issues can derail even the best-planned stream, so testing is non-negotiable. Conduct a full rehearsal at least 30 minutes before going live using YouTube’s "unlisted" or "private" mode. Set up encoders two hours in advance, then run a final check 15 minutes before your stream.
Restart all devices - laptops, tablets, routers - to clear memory and ensure smooth performance. Check for software updates well before your stream to avoid last-minute surprises. During testing, confirm that your local archive files are growing in size to ensure your recording is functioning properly.
In May 2025, POPSUGAR Beauty showcased the importance of preparation during their Dermaplaning basics tutorial. By having all tools organized ahead of time, the host avoided fumbling and maintained a professional appearance. Keep a “Be Right Back” slide ready for unexpected interruptions, and have a backup internet source, like a mobile hotspot, on hand.
Prepare Scripts or Talking Points
Being authentic doesn’t mean being unprepared. Jared Applegate, Associate Product Manager at Switcher Studio, explains:
"Live video feels authentic because it's unscripted, but that doesn't mean you should wing it."
Instead of a word-for-word script, use a bulleted list or story arc to stay on track while maintaining a natural tone. Prioritize your most valuable points early on - those first few seconds are critical for capturing attention.
Organize props, visuals, or cues ahead of time to support your talking points. When addressing live chat, read comments aloud so replay viewers or those on other platforms have context. Keep water nearby and enable “Do Not Disturb” mode on all devices to avoid interruptions.
With careful planning, your live stream can run smoothly, creating a solid foundation for incorporating advanced tools and creative elements to elevate your content even further.
Using AI Tools to Improve Content Production
Once you've mastered live streaming, the next challenge is maintaining a consistent flow of content. Many creators find it tough to meet YouTube's demand for frequent uploads while staying true to their brand. With production hurdles out of the way, AI tools now offer a way to extend the life and reach of your live streams by automating time-consuming tasks that often slow creators down.
What LongStories.ai Does
LongStories.ai is designed to help creators produce narrative-driven videos up to 10 minutes long, cutting out the usual production delays. Its standout "Universes" feature lets you set up your characters, visual style, voices, and storytelling tone once, ensuring your videos maintain consistent branding without needing repetitive prompts - a common issue with other AI tools.
The platform also provides three animation quality options - No Animation, Fast Animation, and Pro Animation - so you can choose between speed and visual detail based on your needs. Bulk editing tools make it easier to tweak multiple videos at once, while API access enables workflow automation for creators managing large volumes of content. As StreamYard aptly puts it:
"Repurposing your content is one of the best ways to add more content while staying consistent with your live videos".
By streamlining production, these AI tools make it simpler to repurpose live content while maintaining quality.
How Live Streamers Can Use It
Live streamers can take full advantage of LongStories.ai to get more mileage out of their broadcasts. Live streams generate a wealth of raw footage that can be transformed into polished, permanent videos. This allows you to reach viewers who missed the live event while keeping your content fresh and engaging. Jonathan Frazier, a writer at Switcher Studio, highlights the value of this approach:
"The more you repurpose, the more exposure your stream gets, and the easier it is to maintain engagement".
Conclusion
Creating a successful YouTube live stream demands careful planning, from promoting your event and structuring your content to ensuring a solid technical setup and engaging with your audience. The difference between a stream that captivates viewers and one that drives them away often boils down to these essential practices.
One key takeaway: audio quality matters more than anything else. While minor visual hiccups might be forgiven, poor sound can cause viewers to leave within just 90 seconds. To avoid this, prioritize using an external microphone, ensure stable internet with a wired Ethernet connection, and invest in proper lighting. These elements establish the foundation of a professional stream and help build trust with your audience.
Beyond the live event, consider how you can extend the value of your content. A single broadcast can be repurposed into multiple formats - short clips for social media, full-length video-on-demand (VOD) uploads, or polished, narrative-driven videos for those who missed the live stream. Tools like LongStories.ai can simplify this process by automating production tasks and maintaining consistent branding, making it easier to keep up with regular posting without exhausting yourself.
FAQs
What are the best ways to promote my YouTube live stream and boost attendance?
To get more people to show up for your YouTube live stream, start by spreading the word early. Share the event details across your social media channels, community posts, and email newsletters. Be sure to clearly highlight the date, time, and any time zone differences to make it easy for everyone to tune in. Build anticipation by hinting at what’s in store - whether that’s special guests, behind-the-scenes content, or fun interactive moments.
Before the stream, encourage your audience to set reminders and invite their friends to join. Once you’re live, keep the energy up by actively engaging with viewers through the chat. Responding to comments and questions in real time can make the experience feel more personal and keep people watching. And don’t forget to test your equipment ahead of time - technical hiccups can quickly turn viewers away.
How can I effectively engage with my audience during a YouTube live stream?
Engaging with your audience during a live stream is essential for building a genuine connection and keeping their attention. A great way to start is by actively responding to comments, asking open-ended questions, and encouraging viewers to participate. This approach helps create a sense of community and shows your audience that their input matters.
To make your stream more lively, try using interactive tools like polls, overlays, or sound effects. Kicking off the broadcast with a casual, friendly greeting can set a welcoming tone - much better than diving straight into a rigid script or countdown. Throughout the stream, keep your audience involved by asking for their thoughts or feedback. This not only keeps them engaged but also makes them feel like part of the experience.
Maintaining a conversational tone and quickly replying to viewers' messages adds a personal touch. By focusing on real-time interaction and using platform features creatively, you can create an exciting and interactive live stream that keeps people coming back.
How can I set up my equipment to avoid technical issues during a YouTube live stream?
Before you kick off your YouTube live stream, make sure your setup is ready to go without a hitch. Start by confirming your internet connection is solid and offers enough upload speed for streaming. A quick restart of your router and devices can also help clear out memory and boost performance.
Next, double-check your encoder settings. Pay attention to the bitrate and resolution - these should align with both your internet speed and your device's capabilities. Pushing your system too hard can cause lags or even cut your stream short.
Lastly, don’t skip a test run. Do a trial stream to ensure everything is running smoothly. From your audio to video quality, testing your setup in advance can save you from unexpected hiccups during your live broadcast. These simple steps can make all the difference in delivering a polished and professional stream.
Related posts
LongStories is constantly evolving as it finds its product-market fit. Features, pricing, and offerings are continuously being refined and updated. The information in this blog post reflects our understanding at the time of writing. Please always check LongStories.ai for the latest information about our products, features, and pricing, or contact us directly for the most current details.