
How to Avoid Continuity Errors in AI-Generated Videos
When creating AI-generated videos, continuity errors can disrupt the flow and make your content look unpolished. These errors often occur because AI generates videos frame by frame, leading to inconsistencies in characters, environments, and lighting. To ensure smooth, consistent visuals, focus on these key strategies:
- Pre-Production: Create a detailed continuity reference document outlining character traits, environments, and styles. Use keyframes and reference points to anchor scenes.
- Generation: Write structured prompts, use frame chaining (linking frames between shots), and rely on image-to-video workflows for stability.
- Quality Control: Review clips for errors such as identity shifts, wardrobe changes, or lighting mismatches. Use tools like spreadsheets to track issues and apply fixes like shorter clips or manual adjustments.
- Post-Production: Align visuals and audio across clips, smooth transitions with intermediate shots, and meet platform disclosure requirements for AI-generated content.
The right tools, such as LongStories.ai or Domo AI, can help lock in visual consistency and streamline production. By following these steps, you can create professional-looking videos that keep viewers engaged.
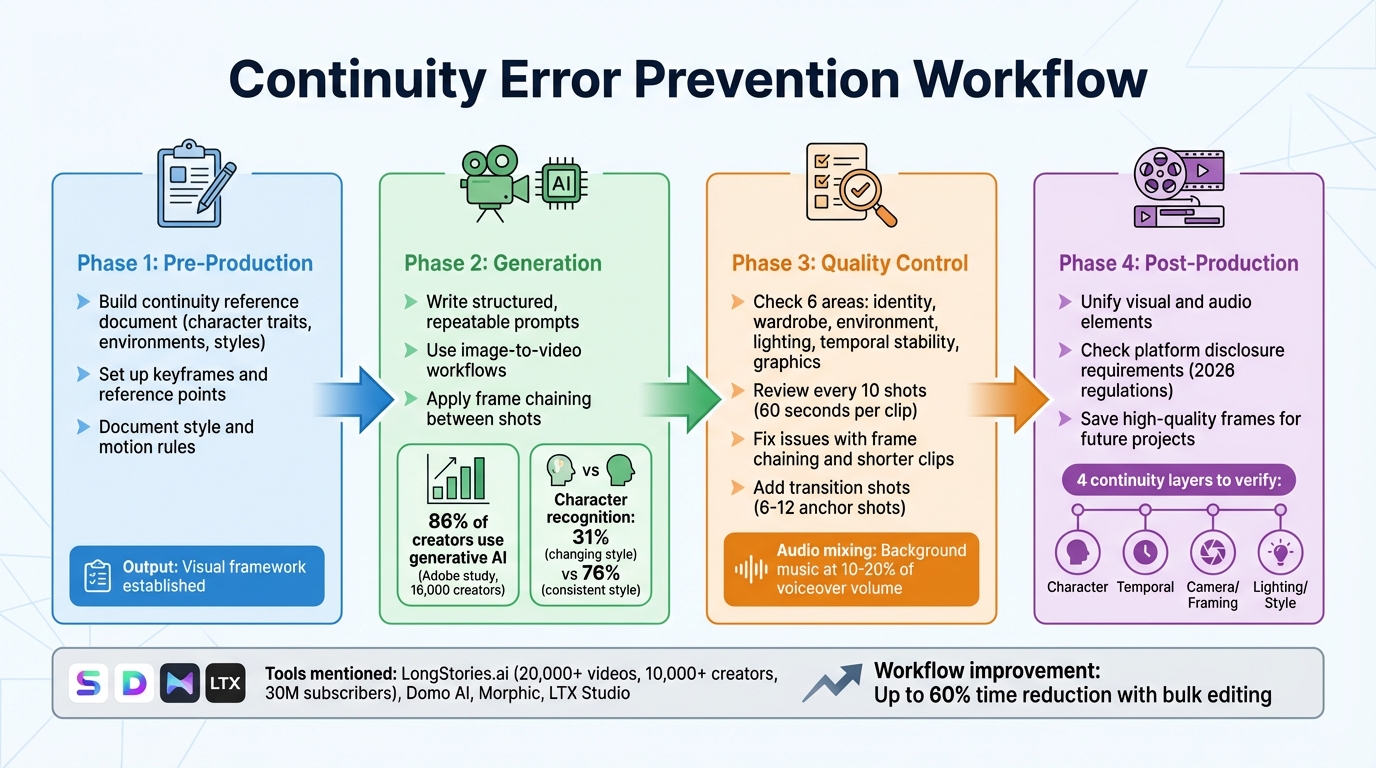
4-Phase Workflow for Preventing Continuity Errors in AI-Generated Videos
The Early Mistakes That Ruin AI Film Projects - And How to Fix Them
sbb-itb-94859ad
Pre-Production: Setting Up Your Continuity System
The most common continuity errors occur before you even create a single frame. If you don’t have a solid reference system in place, AI tools will treat every shot as if it’s starting from scratch - leading to inconsistencies in characters, backgrounds, and lighting. The solution? Lay down your foundation first. Use these steps to establish a consistent visual framework for your project.
Build a Continuity Reference Document
Before anything else, lock in your visual details. Create a document that serves as your go-to guide for everything visual in your project. This includes detailed notes on character traits (hair color, clothing, facial features), environment specifics (wall colors, furniture placement, time of day), and camera settings (angles, distances, focal lengths). Think of it as your project’s visual cheat sheet. Every time you generate a new scene, refer back to this document to ensure nothing changes unintentionally. To make it even stronger, add screenshots or reference images for each key element - AI tools tend to work much better with visual examples than with text descriptions alone.
Set Up Keyframes and Reference Points
Begin with static images before diving into motion. Choose the first and last storyboard frames to anchor each sequence. For example, if a character starts walking from the left side of the frame in Scene 1, the final keyframe should show them on the right side - and Scene 2’s opening keyframe should pick up exactly where Scene 1 left off. Plan out camera angles, object placements, and lighting for every single shot before you start generating. This ensures the AI doesn’t randomly shift the camera or misplace background elements midway through your sequence.
Document Your Style and Motion Rules
Set clear boundaries when it comes to style and motion. Define specifics like how fast characters move, the type of camera motion (static, slow pan, handheld), and the level of animation quality you expect. These rules act as a framework that applies to every shot. Instead of leaving it up to the AI to decide how a character turns their head or how the camera zooms, you’re dictating those details upfront. By treating your process like a structured production pipeline, you minimize the chances of unexpected changes and maintain a consistent visual style from start to finish. The goal here is to move beyond simple prompts and adopt a more organized approach with clear guidelines.
Generation: Keeping Scenes Consistent During Creation
When creating footage, maintaining continuity is essential. Achieve this by using structured prompts and visual references, guided by your continuity reference document. These techniques build on pre-production work, ensuring each generated shot stays true to your established standards.
Write Structured, Repeatable Prompts
Stick to a consistent template for every shot. Start with your character's key details - like facial features, hair, eye color, and age. Then, add clothing and unique traits, followed by the action or scene specifics, and finish with the art style and camera angle. For example:
"A young woman with shoulder-length black hair and light freckles, wearing a red denim jacket, sitting at a cafe table, warm afternoon lighting, cinematic 4k, medium shot, eye-level."
For subsequent shots, keep the identity and style descriptions identical, modifying only the action and setting. This reinforces the visual standards you've set. Runbo Li, CEO of Magic Hour, highlights:
"If the wording changes significantly between clips, many models will reinterpret the identity".
An Adobe study involving 16,000 creators revealed that 86% use generative AI, but inconsistent quality remains a key challenge. Maintaining a consistent art style can significantly improve character recognition, jumping from 31% when the style changes to 76% when it remains steady.
Use Image-to-Video Workflows
Text prompts alone can be unreliable. Instead, use the final frame of the previous shot as a reference for the next - a technique called frame chaining. Additionally, create a multi-angle reference set (including front-facing, three-quarter, and side profile views) to help the AI grasp your character's structure. As Runbo Li explains:
"Using frames from the previous video as references usually produces the most stable results".
Match Start and End Frames Between Shots
Ensure each shot begins where the previous one left off. Export the final frame of one shot and use it as the opening reference for the next. For scenes transitioning between vastly different environments - like moving from a bright outdoor setting to a dark interior - generate a short intermediate clip to smooth the transition. Keeping clips brief helps the AI maintain character consistency. Runbo Li emphasizes:
"This frame chaining method significantly reduces identity drift across scenes".
Quality Control: Checking for Continuity Problems
Once your scenes are generated, the next step is ensuring continuity. This is key to keeping viewers engaged and immersed in the story. Carefully review each clip for consistency before moving into post-production. The focus here isn’t on achieving pixel-perfect matches - AI models often struggle with that over extended sequences - but on maintaining a sense of visual and narrative continuity. As TensorPix explains:
"Continuity in AI video generation is often framed as a technical limitation. In reality, it is a design and workflow challenge".
Check Each Frame for Visual Errors
Go through each shot methodically, looking for issues in six main areas: character identity, wardrobe and props, environment, lighting and style, temporal stability, and graphics or text. To keep track, use a spreadsheet to log any problems every 10 shots. This helps you pinpoint when and where inconsistencies become too noticeable. For example, a character might appear different under neon lighting compared to soft daylight - monitor how such changes affect their recognizability. Spend roughly 60 seconds per clip to catch visual artifacts or continuity errors before moving forward.
Fix Common AI Generation Issues
When errors crop up, there are tools and techniques to address them. Use frame chaining to fix visual inconsistencies: take a clean frame from a successful clip and use it as a reference to regenerate problematic shots. For issues like shimmering textures or objects that morph over time, stick to shorter clips - just a few seconds long - to minimize motion artifacts and internal variation. If wardrobe elements shift or accessories vanish, reinforce these details by pasting your "Wardrobe Lock" prompt block into the regeneration request.
The most critical areas to focus on are the character’s identity, their clothing, and the consistency of the world they inhabit. If clips still don’t align smoothly after multiple attempts, consider exporting individual frames and manually adjusting transitions in your editing software. When inconsistencies persist, enhancing transitions can help blend scenes more naturally into the overall story.
Add Transition Shots to Hide Seams
To smooth over visual seams between clips, use transition shots strategically. If direct cuts reveal noticeable jumps, insert cutaway shots, close-ups, or environmental details to mask the transition. Start by generating 6–12 "anchor shots" to establish a consistent visual style and character identity. These can then serve as reference points for creating transitional footage. For dramatic shifts - like moving from a bright outdoor scene to a dimly lit interior - create an intermediate clip to help the AI adapt to the new setting while maintaining character continuity.
Audio can also help disguise minor visual inconsistencies. During final export, set background music at 10–20% of the voiceover volume to balance the sound and smooth over any visual jumps. When planning transitions, carefully define each shot’s camera angle, lighting, and background elements in your storyboard. This ensures compatibility when stitching shots together later. By integrating these quality control steps into your workflow, you can create a seamless and immersive viewing experience.
Post-Production: Final Continuity Adjustments
Once you've verified each clip individually, it's time to bring them together into a seamless narrative. This stage is where you align all visual and audio elements, ensuring a polished final product. Often, inconsistencies that were hidden in isolated clips become glaringly obvious when they're placed side-by-side. As TensorPix aptly puts it:
"A single clip can hide a lot of issues... The moment you place that clip next to another one, every inconsistency becomes obvious".
Unify Visual and Audio Elements
Play through the entire sequence and carefully check for any mismatches in visuals or audio. These inconsistencies, while subtle in isolation, can disrupt the viewing experience when the full video is played. Pay close attention to the following areas:
- Character identity: Ensure face proportions and clothing details remain consistent.
- Temporal stability: Watch for shimmering textures or edges that seem to wobble.
- Camera perspective: Correct any unintended shifts in angles.
- Lighting consistency: Balance exposure, highlights, and color tones across all clips.
To achieve visual consistency, use tools like TensorShots, which offers features such as "color restore" and AI stabilization. These tools help maintain uniform lighting and style parameters across your footage (TensorShots has earned a 4.5/5 rating from 78 users). Adding a film grain overlay can also smooth out flicker or texture crawling caused by temporal instability. On the audio side, ensure background music and voiceovers are well-balanced, creating a harmonious blend.
Check Platform Disclosure Requirements
Starting in 2026, platforms like YouTube and others have enforced strict rules requiring disclosure of AI-generated content. These regulations, influenced by the EU AI Act and platform-specific policies, mandate clear labeling when videos include AI elements. Before publishing, include a disclosure label in the video description and, if necessary, an on-screen notice. Be sure to review the current guidelines for your target platform, as requirements can vary depending on the region and content type. Meeting these standards not only ensures compliance but also builds trust with your audience.
Save High-Quality Frames for Future Projects
Archive key high-resolution frames to serve as visual references for future projects. These frames act as "anchors", helping you maintain continuity in character identity and style. Focus on saving:
- Close-ups of characters (front, side, and profile views)
- Consistent environment shots
- Frames with strong lighting or stylistic elements
Organize these stills into a well-structured folder system, labeled by character name, scene type, and generation date. This "Character Pack" will serve as a reliable resource for maintaining visual consistency in future productions.
Tools and Platforms for Continuity Management
Picking the right tools is key to ensuring your content looks polished and consistent from the very beginning. The right platform doesn't just handle things on a scene-by-scene basis - it locks in your visual identity at the system level.
LongStories.ai: Reusable Characters and Styles
LongStories.ai makes continuity easy with its Universe system. This system acts as a reusable template where creators can define characters, visual styles, voices, and even world rules just once. From there, it applies these settings across all videos. In just 10–15 minutes, you can set up a Universe and produce up to 10 minutes of consistent, long-form content without needing to make further manual tweaks. So far, the platform has helped create over 20,000 videos for more than 10,000 creators, whose combined channels boast 30 million subscribers.
The platform also offers three animation quality options to cater to different needs:
- "Just Storyboard" mode: Uses static images, perfect for concept testing.
- "Fast Animation": Adds basic movement, ideal for quick drafts.
- "Pro Animation": Delivers high-quality outputs with locked-in character details, lighting, and physics.
Vilma, who works for a movie studio, shared her experience:
We went from 1 episode per week to 1 per day. LongStories has been the biggest help in our workflow.
Additional features include bulk editing tools for adjusting color grading, voice syncing, and style parameters across scenes. There's also API access, which allows for programmatic generation using predefined Universes - ensuring consistent character models across large batches of videos. This is especially useful for creators automating their production processes.
Of course, LongStories.ai isn’t the only option. Other platforms bring their own strengths to the table.
Other AI Video Production Platforms
- Domo AI: Focuses on short clips and uses reference image locking and multi-shot consistency tools to keep characters anchored across scenes.
- Morphic: Leverages morphing algorithms and element libraries to ensure smooth scene transitions. It’s particularly helpful for maintaining consistent lighting and object details between shots.
- LTX Studio: Offers a storyboard-driven workflow with reusable asset libraries and frame-matching tools. This helps maintain continuity between the start and end frames of a project.
For creators, testing multiple clip variants is a smart way to ensure frame-to-frame consistency. Pair that with bulk editing, and you could cut your workflow time by as much as 60%.
Conclusion: Your Continuity Error Prevention Checklist
Throughout this guide, we've explored how careful planning and consistent execution can help avoid continuity errors in AI-generated videos. Maintaining continuity in AI video production is no small feat - it’s a challenge that demands a structured workflow. As TensorPix aptly puts it:
When continuity is handled at the system level, AI stops behaving like a slot machine and starts behaving like a production tool.
The key to polished, professional-looking videos lies in treating AI as part of a well-organized production pipeline - not a quick-fix solution.
A solid continuity checklist should address four key layers:
- Character: This includes ensuring consistency in faces, clothing, and proportions.
- Temporal: Focus on motion stability and eliminating shimmering or flickering textures.
- Camera/Framing: Keep perspectives and movements locked for a seamless visual flow.
- Lighting/Style: Maintain consistent color temperature and exposure throughout.
With these layers in mind, here’s how to reinforce continuity across every phase of production.
Start with pre-production planning. Define character traits, establish style guidelines, and use storyboards to map out spatial relationships. This upfront work minimizes the risk of costly revisions later. During the generation phase, rely on image-to-video workflows with clearly defined start and end frames instead of depending solely on text prompts. Finally, in the quality control phase, scrutinize each frame for issues like wobbling edges, shifting objects, or inconsistent lighting that could disrupt viewer immersion.
The right tools can make this process smoother. Platforms like LongStories.ai’s Universe feature tackle continuity at the system level, while tools such as Domo AI and LTX Studio provide reference locking and frame-matching capabilities. Use features like bulk editing to ensure scene consistency, test multiple variants, and preview audio alongside visuals before finalizing your export. Incorporating these platforms into your workflow strengthens your continuity checklist, ensuring every stage connects seamlessly to produce professional, engaging videos.
FAQs
What’s the fastest way to stop character “identity drift” between scenes?
To keep a character's appearance consistent across scenes, rely on high-quality reference images and carefully crafted prompts. Use a stable reference framework to ensure the character's look remains anchored. If you notice any "identity drift" - where subtle changes creep into the character's appearance - it's crucial to tweak the reference images or refine the prompts before moving forward. This approach helps maintain visual continuity and avoids disruptions that could pull the viewer out of the experience.
How short should AI-generated clips be to reduce flicker and morphing?
To reduce issues like flicker and morphing in AI-generated videos, aim for shorter clips - around 30 seconds or less. Longer scenes tend to introduce problems such as character drift and visual inconsistencies. Keeping clips brief helps ensure smoother transitions and steadier character continuity.
What should I include in a continuity reference document?
A continuity reference document is essential for keeping AI-generated videos consistent from start to finish. Here's what it should cover:
- Character details: Document physical traits, outfits, and facial expressions to avoid any unintentional changes.
- Visual style rules: Define color schemes, environments, and overall aesthetics to maintain a cohesive look.
- Reference materials: Include images, templates, and reusable assets that can streamline the process.
- AI-specific settings: List the exact prompts, parameters, and configurations used in the creation process.
- Quality control checkpoints: Establish review stages to catch inconsistencies before they become a problem.
By following these guidelines, you can ensure that characters, styles, and scenes remain consistent throughout your video project.
Related posts
LongStories is constantly evolving as it finds its product-market fit. Features, pricing, and offerings are continuously being refined and updated. The information in this blog post reflects our understanding at the time of writing. Please always check LongStories.ai for the latest information about our products, features, and pricing, or contact us directly for the most current details.